|
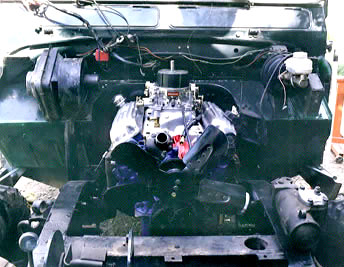
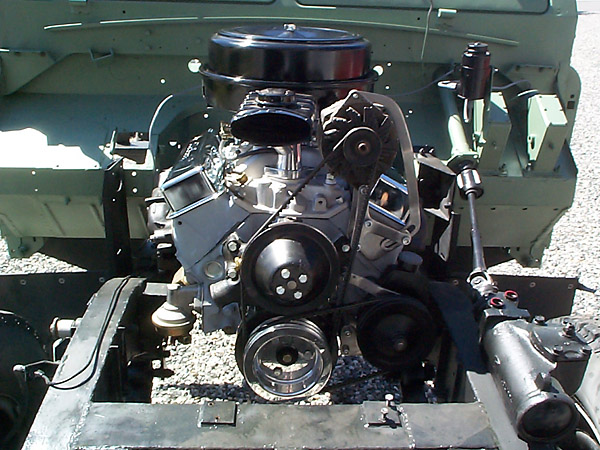
The engine you choose is a personal and often emotional choice. Many Americans grew up in Ford or Chevy biased households so will be biased towards one marque or the other. Many people will want to keep a Rover engine in the series LR at any cost and will stay with the GM derived Rover V8. Some people like diesels, some don't. All the small block American block V8 engines and their V6 derivatives can be made to fit within a series engine bay. Most American small block V8's are very close in weight to the 2.25L Land Rover engine so the suspension and handling characteristics are not affected by the engine weight. When evaluating the fit of an engine, remember to check for things that hang onto the side of the engine at frame level (especially in the right side where the front propshaft is located) and clearance between the oil pan and front differential. And don't forget weight. There are Diesel four cylinder engines that fit nicely but often weigh in at twice the weight of a small block V8 and exceed factory spring ratings. I'm not going to spend much time discussing Rover V8 engines. The Rover V8 drive train has been engineered at the factory so an engine swap is mostly a matter of modifying the bulkhead, mounts and using factory parts. I personally think that these are great engines for lightweight sports cars but are not as good as the American V8s for use in big heavy Land Rovers. They are not as robust as the american V8s, parts are a lot more expensive in the States, they are spec'ed for premium grade petrol and do not get good fuel mileage. In several states fitting that new of an engine into a Series Land Rover would require the Series Land Rover to meet all emissions regulations in effect for the year the engine was built. On the other hand, they are the easiest V8 swap into a Series Land Rover since all the drive train parts work together, are off the shelf and you can just state year and model when buying parts for your conversion. Probably the easiest way to make the conversion is to get a Range Rover Classic, remove the body and install a Series body onto the Range Rover. This has been successfully done a number of times. For many people thinking about a V8, the choice boils down to Ford and Chevy. Each has its advantages and each has its disadvantages. The small block V8 Ford is a couple inches longer than the small block Chevy . The extra length is clearance for a front distributor mount. However the small block Ford is a little narrower than it's Chevy counterpart and is an easier fit if the stock Rover steering box is retained. Replacing series inner wing panels with Defender inner wing panels provides additional space site to side for a little extra space with the larger of the small block engines (350/351). The GM small block V8 will have it's distributor almost against the bulkhead in an area that is difficult to access when the bonnet is attached to the car. The Ford has it's distributor up front and provides very easy access but makes the distributor more susceptible to fan splashed water when wading. Ford makes a rubber boot that goes over the distributor cap and does a great job of protecting the distributor from splash. The stock Chevy oil filter location is better placed for use in a series Land Rover. It faces down at the left rear of the engine for very easy access. The small block Ford oil filter sticks out the left side at frame level on a Rover. The frame prevents removal of a standard Ford oil filter. Ford offers a 90 degree oil filter adaptor that puts the filter alongside the engine instead of sticking straight out. This actually puts the filter in a more protected area than the Chevy filter. Also the shorter Dodge 318 oil filter fits and works OK on a small block Ford and can easily be replaced. The oil pan must have it's deep part in the rear for maximum front axle clearance. This is easily sourced in a small block Chevy because the oil pump is at the rear. The small block Ford has it's distributor driven oil pump at the front so most Ford oil pans have the deep part at the front. You would need to source an oil pan from a early small block Bronco or Ford 4X4 pickup. This pan has the deep part at the rear. The Rover's differential housing can strike this pan on extreme articulation (I learned this on the trail). If you can, modify the front right corner of the pan to effectively remove a 2 inch square cube from the front right corner of the pan. Chevy has the advantage there. The alternator is mounted high on a GM small block engine. Ford tends to mount them low like the LR four cylinder engine. There may be a frame clearance issue depending upon which stock mount came with the Ford engine. However, alternator on a small block Ford can be moved to a higher location to protect it from submersion while deep wading and have more space at the frame rails. The engine will be sitting close to the Rover bulkhead so exhaust manifolds will need to exit down and not out the rear. The GM Ram horn exhaust manifolds fit this application very well and is the perfect solution. Ford exhaust manifolds most all exit the rear and can not be used in their stock locations on the conversion. Thankfully Ford small block exhaust manifolds and be used on either side. The early Falcon V8 left side exhaust manifold (single exhaust system) exits downwards between the last and second to last cylinder, or first & second depending upon which side you mount it. There is a more common Ford pick up exhaust manifold that exits in the same general area but is ngled very differently. You can make do with these if you mount the exhaust maifolds to the engine BEFORE fabricating the frame engine mounts to make sure that the exhaust will not interefer with the engine mounts. Exhaust manifold to engine mount interference can be a big gottcha if you install the frame mounts prior to installing the exhaust manifolds on a Ford. I ended up using the Falcon V8 exhaust manifold on the engine left side and a Mustang exhaust manifold on the right side. The Falcon manifold put the exhaust down pipe behind the engine mount providing lots of clearance for changing the oil filter. A left side Mustang exhaust manifold put the down pipe at the front of the engine allowing maximim clearance from the front propshaft and the starter motor. Block hugger headers are an option for both Ford and Chevy engines that should be carefully considered before going that route. If you do use headrs get ceramic lined ones with the thickest diameter tubing you can find. Be cautioned though that steel tube headers, even ceramic coated ones run very hot and the Series engine bay is small and enclosed on 5 sides. Vapor lock is a very real problem with using headers in a Series engine bay. Especially at low trail speeds. I tried headers for a while and was plagued with vapor lock problems that insulating and moving fuel lines never completely cured. I also makaged to melt the clutch flex line on a long hot slow mountain trail climb. Putting an insulating tube over the rubber hose helped. In general I recommend against using steel headers in these engine bays. The headers only make a power difference in the higher RPMs. Header thermal wrap holds moisture against cool headers. Wrapped headers helps keep under bonnet temperatures down but often rust out the headers in 3 or 3 years from new. The Ford engine is slightly lighter weight than the Chevy but they are so close to each other and the weight of a 2.25L Land Rover engine that weight is not a factor. Parts for both are cheap and on the shelf at any North American auto parts store. I think the choice is basically just individual preference. They are both good reliable cheap engines. Land Rover manual gearboxes will not hold up to American V8s so you will need to engineer a drive train. 10 spline rear axles will not hold up and you may find yourself dealing with leaf spring windup in the suspension. Do your homework on engineering the drive train and you can have a reliable trouble free conversion. I have written a web page covering common gearboxes and transfercases used in conversions. Hopefully you will find it of help. When converting to a more powerful V8 a number of things need to be addressed. The engine should be centred more within the frame to provide adequate clearance for exhaust, left side accessories and left hand steering. Installing the engine more towards the frame centre line also distributes the side to side weight more evenly.
The BulkheadIn order to fit the larger American V8 bellhousing and to centre the engine more within the frame, the bulkhead has to be modified for more clearance in the bellhousing indentation. A small block V8 will need a bulkhead indentation that is 3 inches wider to the right and an inch higher clearance where the bellhousing passes through. The bell housing clearance indentation needs to be modified to allow centring of the V8 engine and space for the larger bellhousing. For my bulkhead, a vertical cut was made near the centre of the indentation. Next the welds that held the right side of the indentation to the rest of the bulkhead were carefully removed allowing the removal of the right half of the bulkhead indentation. A new cut in the bulkhead was made three inches to the right of the edge of the stock bulkhead indentation edge that carefully followed the factory cut. The edges were formed and the right half of the indentation panel was welded back into place along the new cut three inches to the right of where it was previously positioned. A three inch wide flat sheet of steel was welded into place to cover the new three inch gap between the right and left sides of the bell housing indentation. At this point the the bell housing indentation looked factory stock but was three inches wider on the right side. The new edge of the indentation comes to the edge of the Kodiak heater mounting flange. The heater did not need to be moved or modified from it's original location. The end result as a indentation about 25 inches wide. This is plenty for a small block Ford or Chevy but a GM 6.2 V8 diesel will need an indentation about 29 inches wide which will require taking a couple inches off the already narrow left side foot well. The other option is having the engine sit forward of the stock indentation and use a Defender front radiator support and bonnet. The Ford or Chevy bell housing needs more clearance along the bottom edge of the bell housing indentation than the stock Rover one does. The horizontal flange that goes into the passenger compartment was cut out. One inch of metal was cut out of the bell housing indentation along the top of this cut and the flange was welded back into place. Basically the stock shape was retained but it now sits one inch higher and three inches wider. This completes the bulkhead modifications.
The FrameA couple of modifications need to be made to compensate for the centring of the engine and to provide clearance for the radiator. To start off with, the stock battery mount needs to be cut off as does the stock four cylinder engine mounts. New mounts will need to be welded into place. If you are fitting a Ford engine it is a good idea to move the radiator cross member forward an inch from its original location. You just cut the cross member away from the frame then reweld it one inch forward of it's original location. The front tabs that the radiator bulkhead rest upon are cut off one inch shorter and new mounting holes are drilled one inch to the rear on the tabs. The end result is that the radiator bulkhead remains in it's stock location and the fan to radiator clearance picks up one inch. When the stock Rover steering is retained the rod at the top of the steering relay is bent rearwards one inch to maintain the steering geometry. But it would be a good time to seriously consider going to power steering. The front cross member usually does not need to be moved when fitting a Chevy small block. The cross member under the bell housing may require a diagonal divot taken out of the top leading edge for additional clearance of the front prop shaft. My Rover has the extended shackles and front springs reworked for additional articulation so the divot was added. Military 109 frames that were factory fitted with long shackles have a divot in the same location. You can cut a hole for the divot then weld in a curved metal plate. The transmission cross member does not need to be modified. Since the engine will be centred in the frame (engine centre 1 inch left of frame rail to rail centre), the transfer case moves a couple of inches to the right. This movement was compensated for by reworking the transfer case metal mounts that are attached to the transfer case. There is a bell crank that attaches to the frame for the emergency brake. It had to have an arm bent to compensate for the new lateral location. The 109 has a cross member behind the transfercase that passes the rear prop shaft through a hole. The hole needs to recentered around the rear prop shaft. Cut the cross member off the frame, then cut an inch cross section off the right side and rewelded it to the left side. The cross member gets rewelded back into it's original location. The only difference from stock is the hole is moved an inch to the right. This completes the frame modifications.
InsideA new transmission tunnel needs to be fabricated out of a sheet of aluminium. The new tunnel cover follows the same basic outline of the stock cover but is one inch taller and about three inches wider. If you use a Series Transfercase, the lever with the yellow knob will sit on the top instead of the right side (requiring shortening the length of the spring). The floorboard on the right side needs to be cut down a little. When I went to put the stock rubber floor mats back in my Land Rover all I needed to do was cut a couple of inches off the right side of the mat. The tunnel mounting flange on the seat box needs to be reworked for the new tunnel size. That completes the interior & floor panel modifications.
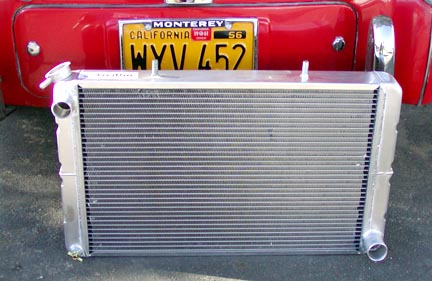
The radiatorI suggest doing some radiator research before specifying a radiator. There are brass and aluminium radiators, vertical flow with the tanks at the top and bottom and horizontal flow with the tanks at each side. There are single pass radiators where the coolant flows in a hose to a tank, down the tubes to the other tank and out. Then there are multiple pass radiators where the coolant takes more then one trip across cooling tubes. Best to do your homework first so you have a decent idea of how different materials and construction affect cooling. The engine, vehicle, climate & vehicle use all affect the kind of cooling system that is best for your application. A puller cooling fan will require fan ducting, a pusher does not. A mechanical fan needs to be directly behind the radiator core, the spatial relationship between the engine and the radiator core is unimportant if you use an electric fan. And you need to be concerned about where and how you plan to mount the radiator. You can just ask someone what they use and buy the same, but it may not work the best in your vehicle for where you drive. If you decide on a custom radiator you will have to figure out all the dimensions, inlet & outlet specs as well as any mounting brackets needed before contacting the company. Custom radiator companies have experienced people who can walk you though pros & cons of different cores to help you choose the best one for your application but you need to tell them how much space you have and where the filler & tubing need to be. Most custom radiator companies also sell mounting brackets so you might want to check out their offerings before finalizing a mounting method. I have used both vertical and horizontal flow radiators with my 302 engine. The vertical flow looks the most like stock but needs to be mounted behind the front cross member with the bottom tank behind the cross member. If you use the mechanical fan there is not much space between the cross member and the fan for a core so you are pretty much restricted to a narrow core radiator. The core size for a vertical flow radiator and mechanical fan is approximately 17 inches high by 24 to 24-3/8 inches wide by 1-1/2 inches thick. The vertical flow radiator I had worked OK with my engine as long as I did not work the engine hard on hot days. It was fine for cool climate driving though. A thicker core radiator and an electric fan to allow space for that thicker core likely would have worked better on those hot days on long grades. I replaced that radiator with a custom horizontal flow aluminium radiator the second time my vertical core radiator needed to be recored.
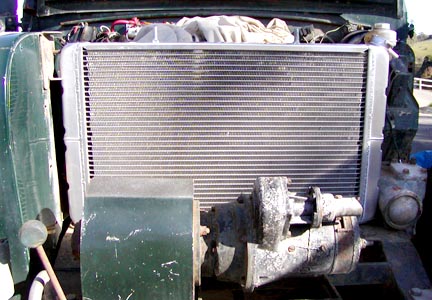
A horizontal core radiator can be mounted on top of the front cross member providing more space for the engine length AND allowing space for a thicker core. The height can be what fits between the cross member and the underside of the bonnet. The width is what fits. Some folks take a wide off the shelf radiator and cut a hole in an inner wing so a tank can fit through. The left side of my radiator rests against the power steering box (with rubber pad between) and I have just enough space on the right side for the bonnet prop rod assembly and for the passage of the headlamp wiring. This radiator sits inside a rubber padded U channel bolted to the top of the front cross member. The 2 vertical studs bolt to a flat plate that also attaches to the top of the radiator bulkhead's shroud. I made 2 mistakes with the specification. The overflow tube is pointed directly to the inner wing with very little space for a hose. I should have pointed it the same direction as the top hose. The second is the bottom hose inlet. The frame is not horizontal where it sits. A hose would fit better if it were parallel to the frame and maybe pointed inwards a little.
Carburation:Car manufacturers generally use engines through a range of car models. There tend to be high performance versions and economy versions of most engines. You need to decide which version works best for you. Performance versions tend to provide lots of power at high revs at the cost of power at low revs. They tend to require premium grade petrol because of the high compression. This is very important if you are building a rig to make it through very loose soil/sand /mud where you need aggressive tyres and high RPMs to cut a path through the soil faster than you sink into it. But most people drive trails at low speeds and don't road race their 4X4s. For most of us economy on regular fuel and maximum low RPM power is the target. Most people over carburate their engines when doing an engine swap for trail work. V8s built for economy from the factory tended to have 500 CFM carburetors. Here's why:
This chart shows engine airflow at a given cruise
RPMs From the chart above you can see that an engine pumps way less air at cruise than most carbs are rated for. The larger carbs allow for those short duration high RPM bursts and provide more fuel for wide open throttle acceleration. A 500 CFM four barrel is generally your best bet for a small block engine being built up for trail work and economy cruise. Of course factory fuel injection will provide better flexibility, reliability and fuel economy but it provides a level of complication that many people are not willing to understand and maintain.
EXHAUST:Here's some data from an interesting chart I have come across regarding choosing the diameter of exhaust system tubing to keep back pressure from being too great for maximum efficiency. Larger diameters than listed on the chart for HP is likely to decrease low end torque. Too much back pressure can make an engine run hotter.
They also suggest specifying mandrel bends because the diameter of the tubing is not changed in the bend. Regular tube bending machines will decrease the tube diameter as much as 20% in a bend making a 2" dia pipe flow the same as a 1-3/4" dia pipe. And don't forget you want a high-flow performance muffler, especially on 109s with the long exhaust pipe.
|
||||||||||||||||||||||||||||||||||||||||||||||||
|
If you would like to discuss any of the contents, or just say hi, please feel free to .
© 1997, 2001, 2017 TeriAnn Wakeman. All rights reserved. |