
|
My front disc brake conversion using the kit made by Torrel Industries Ltd, Sold through
Rocky Mountain Expedition Equipment Ltd.
|
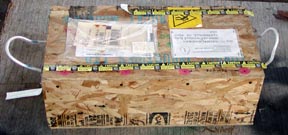 The
disc brake kit came in a sturdy compact wood box that weighs
in at over 100 lbs (umph!). From the beginning everything
seems well designed and user friendly. Each screw that
needs to be removed to open the box is marked with a spot of
raspberry paint.
The
disc brake kit came in a sturdy compact wood box that weighs
in at over 100 lbs (umph!). From the beginning everything
seems well designed and user friendly. Each screw that
needs to be removed to open the box is marked with a spot of
raspberry paint.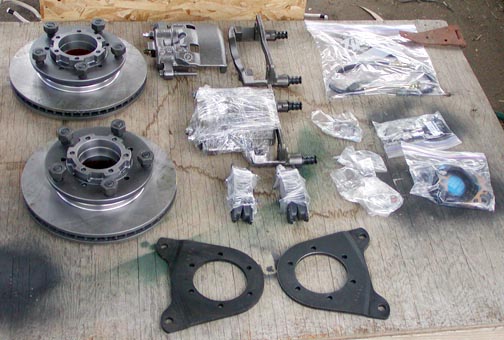
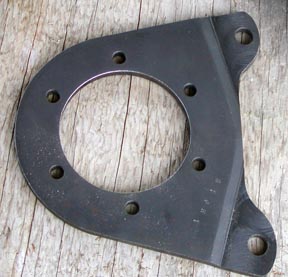 |
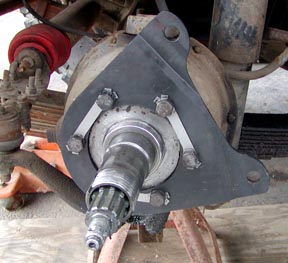
This is the back plate. It goes where the drum brake back plate is mounted and holds the caliper frame in location. The two back plates provided in the kit are sided and are stamped "Left" and "Right" to help you mount them correctly. |
 |
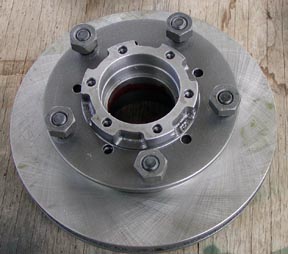 |
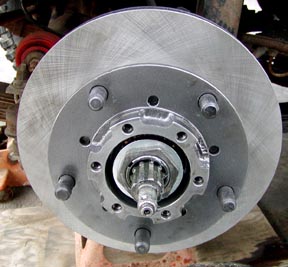
The two pictures above show the hub and rotor preassembled. Mel chose 11 inch rotors as being that largest that will fit all Series 16 inch wheels. It is my understanding that kits with larger diameter rotors restrict which 16 inch steel rims will fit without a wheel spacer.
Note: I use Discovery I steel wheels. I found my wheels to be a very tight press fit onto the hubs. If I were to do another conversion, I would make a trial fitting between the hub and wheel before mounting the hub then file down any excess metal if the wheels do not slide on prior to assembling the kit. One of the hubs was a tighter fit for the wheel than the other, so be sure to check both.
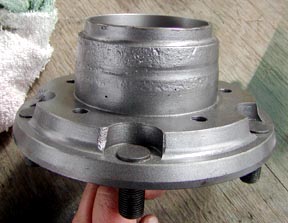 |
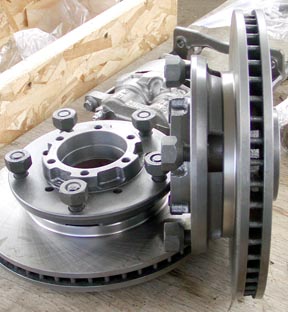
Here is a hub side view. The disc brake hub is slightly longer than the drum brake hub to place the rotor in the correct position for the calipers. This hub is a custom casting . The studs are a larger diameter than the standard series wheel studs. |
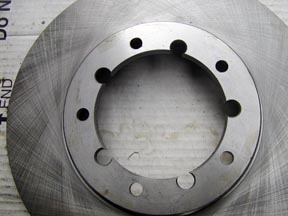
This picture shows the centre section of the rotor. The rotors are from "sport models" of Chevy Luminas and Chevy Monte Carlos equipped with 286mm brakes. The centre of the rotor has been cut to a larger diameter and new mounting holes were drilled. Replacements are available through the kit manufacturer and their dealers. |
 |
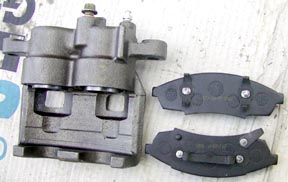 |
The two piston caliper and the brake pads. The pads lock onto the calipers
|
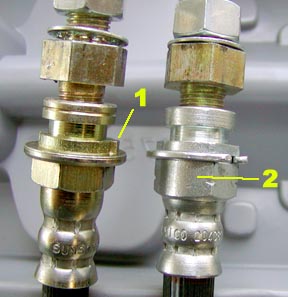
Here is the most confusing part of the assemblyThe rubber brake hoses are handed and I found the instructions to identify which is which to be a little difficult to understand. 1. Is the tang mention in the instructions. This hose goes on the left side of the vehicle. 2. Is the rounded point mentioned in the instructions (round surface where 2 adjacent hex flats would be). This hose goes on the right side of the vehicle. The calipers are marked R & L, but are fitted to the Land Rover opposite the manufacturer's marking. So the #1 hose is assembled to the caliper marked "R" and goes on the left side of the vehicle. The #2 hose is assembled to the caliper marked "L" and goes on the right side of the vehicle. |
 |
 |
Here is the left side back plate installed. It fits where the drum brake back plate was and uses the same fixing bolts and lock tabs. The hole in the top tab is lined up with the rear bolts on the top swivel pin. The hole on the lower tab lines up with the swivel housing oil fill plug. Next step is to lock the lock tabs. Here is a little trick. If you pre bend the lock tabs just a little, about 2/3rds of the way down their length, they will not interfere with the bolt head and the ends are off the back plate enough to get a tool under them to bend them into place. They can be a pain to lock if left flat. The holes are offset on the tabs. Be sure to mount the tabs so that the locking tabs do not partially cover the centre back plate hole. |
Here is the rotor and hub assembly installed with free play adjusted. The process for mounting the hub and adjusting the bearings is the same as with a drum brake hub. Series Land Rovers wheel bearings need to be set a little loose. The workshop manual explains how to set the play with a dial indicator. Here is an alternate method that a lot of people use. Mount the hub and inner hub nut. Tighten down the inner hub nut to eliminate all free play on the bearings. Spin the hub and retighten the inner nut to make sure the bearings are seated properly and that there is no free play Back off the inner hub nut one and a half flats of the nut. This will provide the free play needed for the bearings. Add the lock washer and outer nut per the manual instructions. |
 |
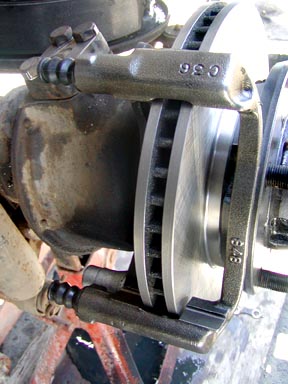 |
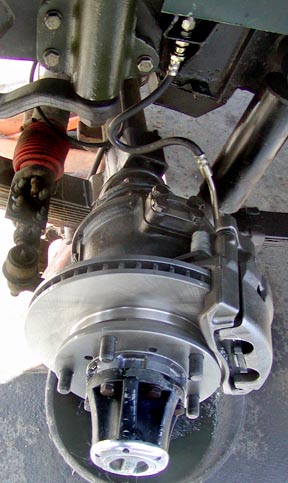
Here is the caliper mounting bracket mounted to the back plate The caliper is held to this bracket by two long slip pins that go through the two corrugated rubber boots at the back of the frame. The caliper is free to move on the pins. The pistons press one pad against the rotor, pushing the caliper away from the rotor which engages the pad rigidly mounted to the caliper. The slip pins that mount the caliper to the caliper mounting bracket get torqued to 80 pounds of torque. You can see a horizontal silver cylindrical object next to the lower rubber boot on the caliper mounting bracket. That is one of the two special bolts that mounts the bracket to the frame plate. This puppy is what requires the 148 pounds of torque. |
This is one side finished and ready to mount the wheel. Yes that is the bottom of a power steering box at the top of the picture and no I do not use the stock tab for mounting the brake hose to the frame. I find that the lower otherwise unused frame mounting tab allows for greater downwards articulation without stretching the rubber brake hose. |
|
Going one step farther
The lower caliper mounting bracket securing bolt may interfere with removing the swivel housing oil fill plug. If it does the instructions suggest shortening the filler plug so that you can get it off and back on. Even if there is no interference with the plug it will be harder to get the plug on and off and to fill the reservoir. Swivel housings are not handed. You can switch the housings between both sides of the Land Rover and not affect steering, suspension or anything. If they are switched, the filler plug ends up facing forward away from the brake caliper.
If you need to remove the swivel assembly to work on axles, differential, replace the swivel seal, work on swivel pins or whatever, you might consider switching the housings to the other axle side. Of course you will needs to keep the steering arms in their original sides.
Additional information from the manufacturer:
Designing the conversion:
During design of the disc brake system we concluded that the only economically practicable approach would be to adapt a widely available disc brake system to the Series Land Rover in a way that minimized the need for any other changes to the Land Rover. Due to the relatively large size of the Series Land Rover swivel ball housing, space between the swivel ball housing and the inner wheel rim is quite limited. We determined that the AC Delco dual piston floating caliper system used on many GM cars was the best choice because of its low profile. The AC Delco calipers and caliper brackets and brake pads can be used without modification and the (GM designed) rotors can be modified using general purpose machine tools to fit our Land Rover application. Because the design is based on relatively straight forward modifications to widely available rotors we are able to commit to providing customers replacement rotors as long as replacement rotors for GM cars are available.
Which master brake cylinder:
Question: The calipers are 2 pot and the 88 master cylinder is designed to push fluid into a single cylinder at each front brake.
Does an 88 master brake cylinder pump enough volume for the disc brakes & get good pedal height on the first try or do you recommend switching to 109 master cylinder?Reply: During application, the pads in a disc brake system are displaced much less than the shoes on a drum brake system so a smaller volume of brake fluid must be moved by the master cylinder. This is offset to some extent buy the larger cross sectional area of the disc brake caliper pistons as compared to the drum brake cylinders but a disc brake system in good condition will have less pedal travel and the pedal will "feel" firmer than in a drum brake system. Note that "pressure" is as important a design consideration as "volume" in choosing a master cylinder. I recommend upgrading any Land Rover to a dual braking system for the significant additional safety margin the dual system provides. Power boost is helpful (and commonly used) in disc brake systems which do not have the same "positive feedback" characteristics as drum brake systems.
Mel
Also see my web page providing a Series
Land Rover disc brake conversion overview
and my web page about converting
a Series Land Rover to dual circuit power brakes
If you would like to discuss any of the contents, or just say hi, please feel free to .
© 1997, 2001, 2017 TeriAnn Wakeman. All rights reserved.