|
The Land Rover factory workshop manual doesn't say much about the combination headlamp/ignition switch used on positive earth Series Land Rovers. So I have created this page to let you know what I have learned over the years. The terminal markings on the back of the combination ignitin/headlamp switch are difficult for me to read so I made a diagram of the rear of the switch to help me when working back there. I have included it for those of you who also have problems reading black on black. I have not covered rebuilding this switch because I have not successfully done so. The only word of warning I can provide is to disassemble the switch body inside clear plastic bag or the equivalent. There are spring loaded parts that can be launched a considerable distance. Page Contents
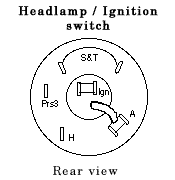
GeneralThe combination ignition and headlamp switch was supplied on all civilian positive earth Series I, II and IIA Land RoversLand Rovers. This switch was replaced by separate switches when Land Rovers were switched to negative earth. The ignition switch is a simple on-off switch. A manual starter switch provides power to the starter motor. There are three variations of the combination ignition headlamp switch that I am aware of. The earliest version has screw on terminals and came on the series I and series II Land Rovers. The next version has spade connectors in place of the screw type. The newest version does not have the Prs3 connector on the back. The Prs3 terminal provided power for the front parking lamps only then the switch in in the parking lamp position. When converting to this switch, move the wire to one of the S&T terminals. Otherwise all the switches appear and work the same. Positive earth Series Land Rovers came from the factory with a minimal electrical system that didn't draw much power. Hence the switch is not designed to carry more than 13 or 14 amps. Running too much power through the switch will burn it out. If you add electrical accessories, higher wattage headlamps, worklamps, fog lamps and such it is a very good idea to add relays to handle the current. These days, my switche's headlamp circuit runs the tail lamps, front parking lamps and 2 relays for the headlamps. My ignition circuit only operateds a relay that handles all the switched power for the Land Rover's electrical system. I went through four ignition switches before I decided to add the relays. Ignition lock removalThe key needs to be in the ignition lock in order to remove the lock. There is a small hole in the side of the switch assembly between the instrument panel and the wire clamp. When the switch is mounted in the panel the hole is at the bottom of the switch. The headlamp switch needs to be in the off position for the hole to be open. This hole reaches down to where a spring loaded pin resides on the lock assembly. You need a very fine phillips screwdriver to push the pin down and release the lock assembly. The hole in the switch body is in line with the lock assembly's spring loaded pin somewhere between the off and on position. Push the screwdriver into the hole and slowly rotate the key. You can feel the point go in a little farther when the pin is lined up with the hole. Press down on the screwdriver and gently pull on the key to remove the lock assembly. Ignition lock installationThe key must be in the lock assembly when you install it into a switch. You will need to line the lock assembly up so that the retractable pin is on the same side as the release hole. Push the lock assembly into the the switch body. The pin automatically locks into place inside the switch body. Headlamp switch lever removalThe phenolic headlamp switch lever is held in place by a single spring loaded metal pin. The pin fits into a hole in the side of the phenolic light switch lever. The hole faces the bottom of a mounted switch. Insert a punch into the hole to depress the pin while pulling on the knob. You need to press the pin down to the surface level without inserting the punch into the hole that your pin is retracting into. If you do, your punch will keep the knob locked into place. Headlamp switch lever installationTo replace the knob, line the retractable pin up with the hole and slide the knob onto the switch. The pin automatically locks the knob into place. Connectors on the back of the switch
|
||||||||||||
|
If you would like to discuss any of the contents, or just say hi, please feel free to .
© 1997, 2001, 2017 TeriAnn Wakeman. All rights reserved. |
||||||||||||