|


Step by step How-to instructions
for the factory window channel materials
and
Modern channel material from Rocky Mountain
Replacement Window Track Kit # RMG9517K
The
factory workshop manual does a poor job describing how to replace
the rear side sliding windows and what advice it does provide is
misleading. I wrote the draft for this page in 1997 when I replaced my window channels because I found the manual's description to be next to useless. Unfortunately, I found myself doing the job over again in late 2008. The fuzzy material used in the window channel not only holds in moisture but it also collects dirt, debris and makes a fine place for moss to grow. All this build up inhibits the windows from sliding and the materials just do not hold up in a moist environment. I was not pleased that I had to do the job over again if I wanted to be able to open and close my rear side windows. The window channel materials used by Land Rover were old technology in 1960 when my truck was built and clearly did not have the service life I wanted them to have.
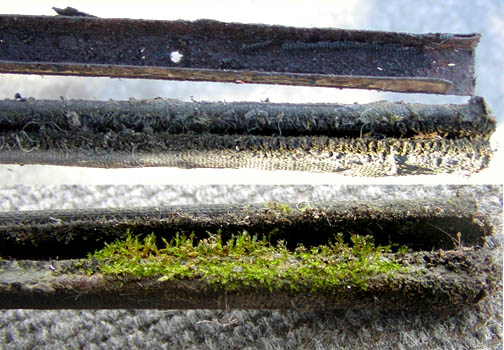
My Genuine Land Rover window rails only 11 years old
I decided that I didn't want to replace the window channels every decade just because I lived in a moist area so I looked to see what else might be available that was a little more modern. I found the solution at Rocky Mountain. They offer a window track kit for rear side sliding windows that uses the rubber sliders from their well regarded aluminum front door tops. This is another one of their hidden products, like the disc brake conversion kit, that does not show up in their web sites. Personally I've never understood why these guys come up with good products that they don't tell anyone about. Anyway I decided to go with the modern tracks instead of using 1940's technology that provides a predictably dismal life expectancy. To obtain the secret Rocky Mountain rear side window channel kit you need to contact them, knock on the door three times, pause, then one more knock. When the little peephole in the door opens tell the guy that TeriAnn sent you for Replacement window track kit #RM9517. I keep wondering what other nifty solutions they have secreted away that you have to ask for before they will tell you they have it.
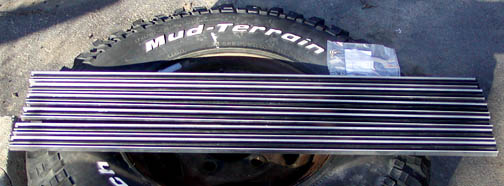
This is the contents of Rocky Mountain replacement window track kit #RM9517
6 rubber window channels in Stainless steel frames and a bag of stainless steel mounting screws
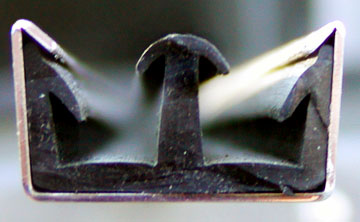
Cross section of the Rocky Mountain window channel
How to replace rear side sliding window channels in a Series Land Rover
The channel replacement instructions will work for both stock and the modern track replacement
You will Need:
- Channel replacement kit with new channels and mounting screws
- Aluminum 3/16ths pop rivets. The one with aluminum centres
- one or two tubes of adhesive RTV #81158 (16BR), (I used one tube per side)
- Rubber washers (spacers), LR # 340391 These align the sliding window catch by adding or subtracting spacers. Quantity needed varies by individual truck. I just order a dozen and saved the left over washers. Read instructions before ordering as you may not need these.
- A small amount of Dumdum or equivalent flexible sealing material for the gap between the galvanized drip plate and the ends of the window frames
- Tools: Drill with 3/16th bit, rivet tool, saw for trimming window channels (if using the Rocky Mountain kit), screw driver, narrow putty knife or equiv. to loosen channels, tool to loosen debris in the bottom drain channel, water source to help clean drains and possibly tools for cutting or forcing channel mounting screws with buggered heads.
Removing the old tracks
First of all, the manual tells you to unbolt and remove the bottom
galvanized drain assembly that holds the bottom slider rails. It is wrong. You
can not remove this assembly without first removing the windows.
There is no need to remove this piece when replacing window channels.
The key is starting at the top.
1. There are two stainless steel latch slide channels pop riveted to the top of the window frame. These need to be removed by drilling out the 3/16ths pop rivets
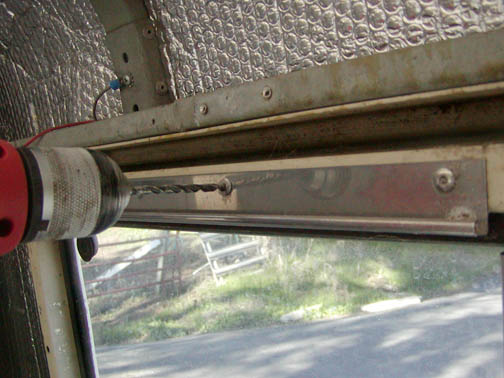
These need to be removed by drilling out the 3/16ths pop rivets using a 3/16ths drill bit
2. Remove the window latches from the windows and inside
top rails. There is a small metal part in the latch that pops into
the holes in the top rail. It just sits into a hole on top and can
easily fall out. YOU DO NOT WANT TO LOOSE THESE. If you do you will
need to purchase a complete new latch assembly. If your windows slide easily when the latch is released and you are using the same kind of window channels for the replacement, you can skip this step and keep the latches attached to the window panes.
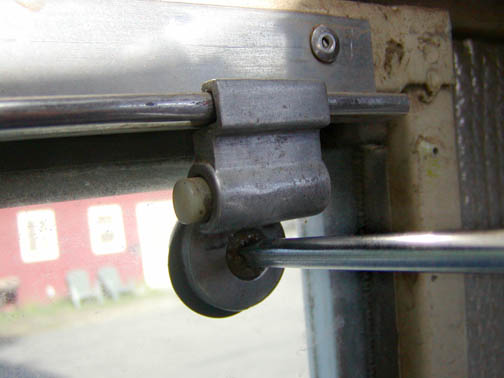
Do not loose the pin inside the latch
3. Now you need to hunt screws inside the top and side slide
channels. Commonly there are two screws on each vertical channel.
They roughly divide the vertical channels into thirds.
The number of top and bottom screws can vary from vehicle to vehicle but they are usually side by side in each channel. Move the window glass to one end and look for a screw about 2 inches in from the end and another near the glass towards the middle of the window opening. Slide the glass to the other end & search again.
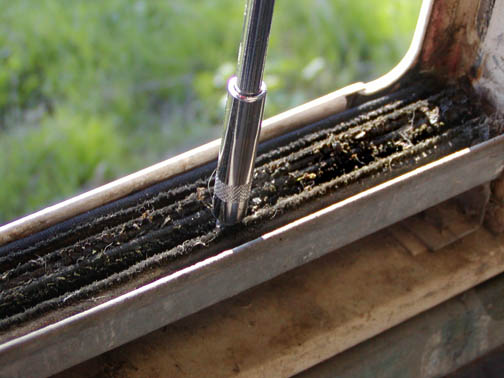
You will want to clean the debris away from the screw heads, make sure the slots are clean and spray penetrating oil before attempting to unscrew them. Usually it is the screws on the bottom channel that have the worst rust problems. You can remove the windows with just the top and side channels free then free up the bottom channel with the windows removed.
The rear vertical
channel comes with a metal spacer that will come out with the channel
when the screws are removed. The channels may stick in place, either
from a glue or from age and heat on the materials. Careful prying
should get it off.
4. Once the screws are removed from the top and side rail channels,
pull/push the top of the windows inwards. The factory used a glue like sealant to help keep moisture from seeping around the channels so you may have run a putty knife between the channel and frame and to do a little prying first to separate the channels from the window frame.
Pries the window channels from the top. The top channels, side channels and windows
should come out together.
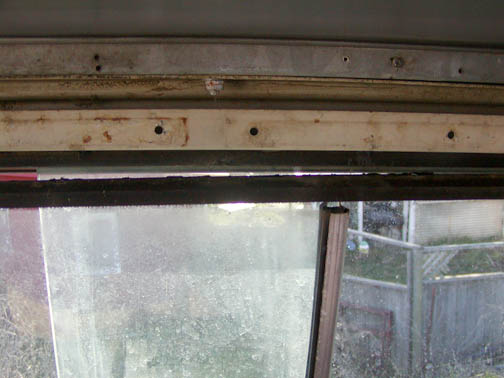
5. Once the widows and channels are out, clean the debris from inside the galvanized steel drip pan. Below the bottom window channels is an aluminum strip that is crimped over the bottom window frame. This is a friction fit and can be prised up and out. Remove this and clean the galvanized drip try and drains. Make sure the drain tubes are completely clear of debris. Running water really helps with this step. Replace the aluminum strip after cleaning.
The drip tray tends to collect dirt and plant debris, clogging the drain holes
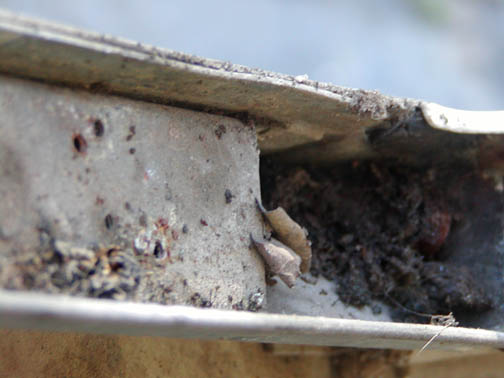
6. Clean the window channel mounting areas of all dirt and old sealant. There is black dry putty like stuff at the bottom corners between
the outer edge of the galvanized drip channel and the window frame sides (or at lest there was when the vehicle left the factory). It's purpose is to keep water flowing down the vertical side channels from missing the drain pan.
If it is not in very good condition or if it came out with everything
else you will want to replace it. This stuff is called Dumdum sealant. It works well for gaps between parts in a vehicle because it always remains flexible. It is normally sold in short strips at better
auto parts stores. This is the same stuff the factory puts around
the edges of your floor panels to seal them.
7. Clean up the window frame around where the channels mount. This is a good place to interrupt the project if you are painting the hard top.
NOTE: Assembly will be in the order of bottom channels,
windows plus top channels then side channels.
Organize your window channels. For each side window, there are
two short vertical channel sections plus four longer channel sections.
Of the four, two are identical long channels. These are the top
channels. The shorter channel without notches at the ends is the inside
bottom channel. The shorter channel with a notch cut at each end
is the lower outside channel. The notches face the outside. This notch is to allow water to drain from the outer bottom channel into the drip tray below.
8. Place Dumdum or equivalent putty at the junction between the ends of the galvanized drip channel and the window frame ends. This is to keep water from flowing past the drain channels into the interior of your vehicle.
9. If you are using new windows or are missing the rubber wiper seals install new wiper rubber (LR#332230)
and metal retainer (LR#330661) centered vertically on the glass. The rubber wiper seals the space between the sliding windows to keep out rain moving sideways on the window when the vehicle is moving.
10. Temporarily place the rear side channel spacer in place
and use it to locate the notched lower channel. Place the bottom channels into position with the notches on the outside channel facing out. Centre the
bottom channels between the ends. Push both channels towards the outside to eliminate
any space between the channels and the channel and wall. Install a center and end screws at the inside bottom of each bottom
channel.
NOTE: The new channel securing screws provided by Rover
has a larger diameter top than the old ones. The original ones were usually
angled towards the outside of the channel bottoms. With the larger
head, drill the hole in the centre straight down in the centre of the channel so the glass doesn't
hang up on the screw head.
11. Apply adhesive RTV #81158 (16BR) to the top channel mounting surfaces of the frame. This RTV serves to keep water from flowing between the base of the channels and frame onto the interior walls of your vehicle. Set both windows in the lower channels and put the top
channels in place on the top of the windows. Push the windows and
channels up into place. Slide both windows to one end. With all
the slack between top channels removed, add a screw on each top
slide near the edge of the glass and then a second near the end.
12. Slide the windows to the other end and add a screw on each top
slide near the end of the channel. If you wish you can add another top screw towards the glass end of the opening like the factory did. The three screws on each channel should hold the channel in place quite well.
13. Apply adhesive RTV to the front vertical channel mounting surfaces of the frame. Line up the front vertical channel with it's corresponding
top and bottom channels and secure it in place with two screws.
14. Apply adhesive RTV to the rear vertical channel mounting surfaces of the frame. Set the rear channel spacer and rear vertical channel
into place. Line the rear vertical channel up with the inside channels.
Don't worry about a tight fit to the spacer. Secure it into place
with two screws.
15. Secure the stainless steel rails back into place with
3/16ths aluminum core pop rivets.
16. Install the window latches into place using new gaskets if you had previously removed them.
The latches and their mounting screws are different lengths and
will not fit if you get them backwards. Use additional rubber gaskets
between the window and latch as spacers to get the latch lined up
with the sliding rail. If it is cocked, the latch will not release
smoothly and it will try to catch on each hole in the slide. This is critical to keep the sliding window from hanging up. What you want is to have the rail surface with the holes to be parallel with the surface of the latch that moves over the rail.
And that is all there is to it. The window movement will be stiff
at first. But it will look nicer and your rear interior will be
dryer.
Reassembly of the window using Rocky Mountain window channel kit
NOTE: Assembly will be in the order of bottom channels,
windows plus top slide channels then side channels.
Trim your window channels - The channels will need to be cut for proper fit. If your old channels are in good enough condition you can use them as cutting guides. The top channel takes up the entire length of the window frame. The bottom channel should be about 1/4 inch shorter than the inside opening of the drip tray. When it is mounted over the drip tray it should be centered so that water can flow out the channel ends into the drip pan. You can cut an additional slot in the bottom ends of one of the channels to mimic the drain slot in the original factory channel. The cut slot will be the outside slot when you mount the bottom channel. Two of the six channels supplied with the kit get cut down to become the side channels. The side channel needs to fit the space between the top and bottom channels. You do not need the aluminum spacer that is used with the stock channels on the rear side of the window. I suggest saving the aluminum spacers just in case you ever sell the truck to someone who wants to do a factory like restoration.
After cutting the channels I suggest making a trial fit of all the channels together with the glass to assure that everything fits properly. The wrong time to make final trim cuts is after you have already applied the adhesive and discovered one or more of the channels is slightly too long.
Using screws or not using screws - The RTV #81158 (16BR) adhesive does a good job of securing the channels. If you use an adequate amount of the RTV adhesive you can assemble the window without using screws. Or you can assemble the channels the way the factory did with both adhesive and screws. If you use the screws you will need to cut space in the bottom of the rubber channel to recess the screw head. The factory style channels depends upon the fuzzy material to keep the glass off the screw heads. An X-Acto knife or equivalent should do the job. I just used a tube of RTV adhesive on each window and ignored the screws. Time will tell how wise a choice that is.
8. Start with the bottom channel. It should be centered in the window frame. If you have cut drain notches in the bottom end of one of the channels to aid draining, the notches should be to the outside. There should be space at both ends for water to flow into the drip channels. If you are using screws to mount the channel you do not need to use the adhesive on this channel as it is sitting directly over the drain pan.
10.If you are using new windows or are missing the rubber wiper seals install new wiper rubber (LR#332230)
and metal retainer (LR#330661) centered vertically on the glass. The rubber wiper seals the space between the sliding windows to keep out rain moving sideways on the window when the vehicle is moving. The gap between my sliding windows is 0.28" on one side and 0.24" on the other. The rubber seal was long enough to bind the windows when I went to change sliding directions. I ended up trimming the seal height down for easier sliding.
11. Apply adhesive RTV along the frame surfaces the top channels sits against. Set both windows in the lower channels and put the top
channel in place on the top of the windows. Push the windows and
channel up into place. If you are using screws, slide both windows to one end. With the top channel channel against the frame edge, add a screw on the top
channel near the edge of the glass and then a second near the end.
12. Slide the windows to the other end add a screw at the other end of the channel.
13. Apply adhesive RTV along the frame surfaces the front channel will sit against. Line up the front vertical channels with it's corresponding
top and bottom channels so the glass can easily slide into the vertical side channel. If you are just using adhesive RTV to retain the channels keep a window in place all the way forward to anchor the locations as the adhesive sets up. If you are using adhesive and screws, secure the front vertical channel in place with two screws.
14. Apply adhesive RTV along the frame surfaces the rear vertical channel will sit against. Line up the rear vertical channels with it's corresponding
top and bottom channels so the glass can easily slide into the vertical side channel. If you are just using adhesive RTV to retain the channels keep a window in place all the way forward to anchor the locations as the adhesive sets up. If you are using adhesive and screws, secure the rear vertical channel in place with two screws.
15. Secure the stainless steel rails back into place with
3/16ths pop rivets.
16. Install the window latches into place using new gaskets.
The latches and their mounting screws are different lengths and
will not fit if you get them backwards. Use additional rubber gaskets
between the window and latch as spacers to get the latch lined up
with the sliding rail. If it is cocked the latch will not release
smoothly and it will try to catch on each hole in the slide.
And that is all there is to it. The window movement will be stiff
at first. But it will look nicer and your rear interior will be
dryer.
Modifying the latches to slide easier
I was asked: How did you modify the back windows to slide easier? They have always been very stiff on mine to the point that they rarely get opened.
I had the same problem. In frustration I just took the latches off and went without latches for over a decade. When I was replacing window curtain sliders and adding a finish trim around the windows I decided to address my problem with sticky sliders and put the latches back on.
First I ran a finger down the underside of the stainless sliders that the latches slide on and discovered that one of the holes had not been cut cleanly and there was an edge of metal sticking down to trip up the slider. I got out a file and files that edge smooth.
Next I removed the slider locating pins and slid the unattached sliders along the stainless steel strips. I noticed that they bind if you do not get the angle between both parts just right. What the LR factory expects you to do is adjust that angle by adding or subtracting the rubber gaskets between the window and the glass to get the angle right. I was never able to get the just right angle which is why I took the latches off in frustration.
The latch makes a sideways 'U' shape. The bottom of the latch sideways U is what gets caught. So what I did was take a file and filed the bottom of the sideways U to about a 10 degree angle downward towards the outside. This provides more space for the latch to slide without getting stuck. I rounded off the edges of the bottom side of the sideways U so that there would be no edge to catch against.
Next I cleaned out the hole for the pin with a spray cleaner to remove anything that might inhibit the fall of the pin when you press the button. I dropped in a pin and pressed the button to make sure that the pin fell freely all the way. One of the pins was a tight enough fit in its hole that it wanted to hang up. I drilled that hole outrigger by one drill size and recleaned the hole. The pin fell properly into the hole when I pressed the button. I reassembled all the latches on the windows using a single gasket on each side of the window and the latches slid smoothly.
Return to page top
|