|
This uses a technique that Scotty taught me many moons ago ....
First some background:The inside of the swivel ball is almost half filled with 90 wt gear oil. This oil is not under pressure. The purpose of the seal is to keep that pool of 90 wt from leaking out the bottom half of the swivel when the front axles are not turning and for the top to serve as a splash shield when the front axles are turning. Only the bottom two thirds or so of the seal works to keep the pooled oil in. The purpose of that smooth clean swivel ball is to give the seal a smooth surface to ride on so the seal lip seals and is not damaged by rough edges. The purpose of optional swivel boot is to keep dirt off the swivel ball surface so that a particle does not destroy a part of the lip or get lodged in the seal lip. A problem with a boot is that they can trap moisture inside and accelerate swivel ball rust pitting. This can be a real problem if you wade your Land Rover frequently, or you live in a place where salty water can get splashed up from the road. Many people forgo the boot and make cleaning the swivel ball area a part of their regular after trip maintenance.
FIRST A CAUTION:This technique was developed because the Land Rover warranty labour hours rate was too tight for most warranty shops to break even. It is a laour short cut created to allow the warranty repair shops to complete the job within the time the factory labour rate book allowed. This technique was used on genuine Land Rover swivel seals. IT will not work with hub seals sold by Britpart and possibly other aftermarket companies. Britpart uses a smaller diameter retaining spring which does not come apart like the Land Rover seal spring does. If you have seals whose springs do not separate, you will need to either reuse the springs from the old seals or replace the seals per the workshop manual instructions.
Now for the fix:The very first thing that you need to do is thoroughly clean the swivel ball and seal area then examine the swivel ball itself. If your swivel balls are in good condition (smooth without pitting) you can just replace the seal. If your swivel ball is pitted, you need to get out the workshop manual and disassemble the whole thing to repair or replace the swivel ball. This would also be a good time to renew the railko bushings too. Since you will have the tie rod disconnected, you might as well check the tie rod ends and replace them too if needed. If you do decide to remove the swivel ball, the bolts holding the ball to the end of the axle housing are whitworth. I replaced mine with Grade 8 fine thread bolts. Since the goal is a smooth surface for the seal to ride on, the ball can be repaired with a good body or epoxy filler. If you make this kind of repair, you need to be absolutely sure that the surface is very smooth and you keep the contours correct. Just the tiniest edge from your repair can damage the seal's lip. The ball can also be repaired by having it hard chromed. Alternatively, you can just purchase new swivel balls. Assuming that your swivel balls are in good condition, you can replace the seal without disassembling the swivels. First, drain the swivel, remove the seal retaining plate and pry out the old seal. Cut the old seal off and discard. Clean the area around the seal and the exposed swivel ball taking care not to get dirt into the swivel housing (Do as much cleaning before removing the seal as possible).
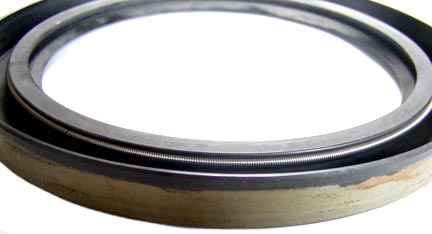
The new seal has a spring that needs to be removed
The Land Rover factory spring appears to be a ring but it is a straight spring with one end tapered. The tapered end is screwed into the non tapered end. You can unscrew the spring then screw it back together around the small end of the swivel ball.
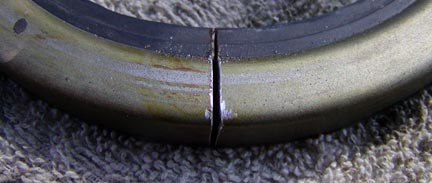
Next make a thin cut through the swivel seal. You want this as thin as you can make it. A thin saw blade is good, a cut off wheel or file is bad.
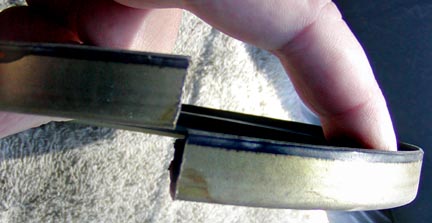
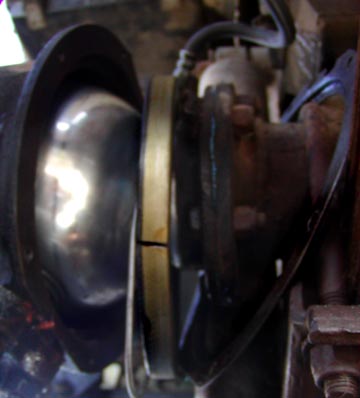
This is the direction that you open the seal to keep it from distorting. Open it just wide enough to snake it around the narrowest part of the swivel ball (which seems really wide as you do it).
Refill the swivel ball and you are done. |
||
|
If you would like to discuss any of the contents, or just say hi, please feel free to .
© 1997, 2001, 2017 TeriAnn Wakeman. All rights reserved. |