|
Eighteen gallon rear petrol tanks came on 109 four door Land Rovers and high capacity pickups. The two door 109's came with a single 12.5 gallon petrol tank located under the right front seat. One way to increase the fuel capacity of a 109 two door without raising the center of gravity is to add a rear fuel tank.
Mounting the tankThe 109 two door frame already has the rear tank mounting holes pre-drilled in the rear cross member and the front tank mounting brackets are welded in place. However, there were some frame differences that require modifications to get the tank to fit.
The rear tank has a rectangular grove along the top to provide clearance for the second to rear cross member. There is a rubber tube that goes between the two high areas to equalize pressure. On the four door models there are two access hatches in the bottom of the bed. The front hatch provides access to the front equalization hose connection. The rear provides access to the rear equalization hose connection, the filler vent hose connection, and the fuel tank sender unit. I obtained the access hatch covers from a 109 station wagon being parted out. I also made measurements of the hole locations and sizes. There are stiffener ribs on the underside of the bed. Two longitudinal ribs and one transverse rib provides a resting surface for three sides of the cover plates. I cut out the access holes, being very careful not to cut the stiffener ribs. Next I riveted a sheet of metal to the underside of the fourth side to create the fourth resting surface. At this point the rear tank can be mounted to the frame using stock LR mounting hardware.
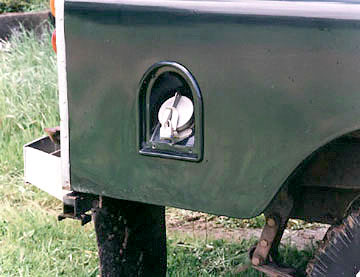
The fuel fillerThere are a number of ways to set up the filler. The simplest I
have seen is a fitting for a fuel cap welded onto the intake for
the tank, and a hatch door fitted to the side to get access to the
filler. I wanted something that looked Land Rover. I used the filler system from a 110 Land Rover High Capacity Pickup. This is a plastic part that fits into the side of the body and holds the filler. The filler and the connecting hose were also Land Rover High Capacity Pickup parts.
The High Capacity Pickup filler parts mate properly with the fuel tank and looks like they came on the car from the factory. Next, I installed the equalizer hose to the two high spots of the fuel tank and routed the fuel line to the front on top of the frame rail. I have a three way brass fuel switch that I purchased from my local auto parts store. It is mounted on the front of the seat box and switches among both front fuel tanks and the rear fuel tank. This installation, along with the second front petrol tank, provided me with a 42 gallon fuel capacity at frame height protected inside the body. |
|
If you would like to discuss any of the contents, or just say hi, please feel free to .
© 1997, 2001, 2017 TeriAnn Wakeman. All rights reserved. |